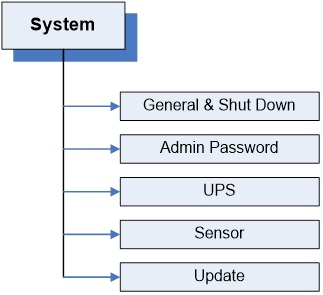
1. Menu - System
1.1 General & Shutdown
 Server Name: The name given to the NAS unit, such as “MyCompanyNAS”, etc.
Server Description: Enter description to help identify usage of this unit. Example: “The NAS backup for my SQL server,” etc.
Date / Time / Time Zone: Enter the current date and time zone of where this NAS is located in.
Language: This setting determines what language the OS will display on the network client.
Current supported languages include:
- English (default)
- Chinese Simplified
- Chinese Traditional
- UTF-8
Admin Language: This setting determines what language is displayed on the NAS Admin GUI menu, accessed via web browser.
Currently, supported Admin Languages are:
- English (default)
- Simplified_Chinese_UTF8
- Traditional_Chinese_BIG5
- Traditional_Chinese_UTF8
Note: the setting for “Language” and “Admin Language” are two different settings. Generally, it is advised that they should be set the same. Otherwise, the folder name or share name created by NAS Admin GUI will not be the same as what is displayed on the network client.
Apply button: Click the “ Apply” button to save any changes and put them into effect.
Shutdown button: Click to safely power off the NAS system.
Reboot button: Click to safely reboot the NAS system.
Delay before Shutdown: Desired number of seconds to wait before initiating the shutdown process. By default, it is set to ‘0’ seconds.
Check Filesystems on Startup: This option will force the NAS OS to do a filesystem check on each XFS volume (network share) every time it boots. By default, this function is turned off.
1.2 Admin Password
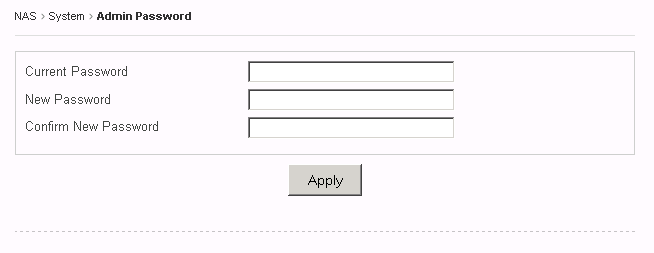
This page is used to change the current admin password to a new password.
Current Password: Key in the current admin password.
New Password: Key in the new desired admin password
Confirm New Password: Re-key the new desired admin password to confirm.
Apply: Click the “Apply” to save change of password.
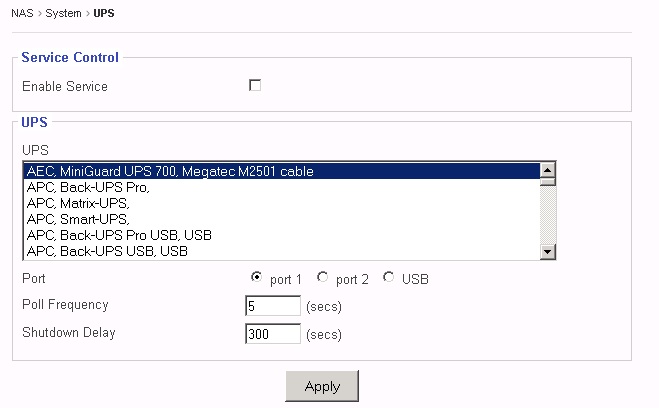
1.3 UPS
 This page is to enable/disable UPS (un-interrupted power supply) Service, to manage some UPS selections/settings.
Service Control à Enable Service: Checking this option box will enable UPS service. By default, this service is disabled.
UPS: This window lists the supported UPS brands and models. Scroll down to find more brands and models.
Port: ‘port 1’ = COM1 ; ‘port2’ = COM2 ; ‘USB’ = USB port on the NAS system . Select the proper Port Type according to what connectivity you have between the NAS and your UPS.
Poll Frequency: This represents how often the system will check the UPS status. By default, if the USP service is enabled, this is pre-set to 5 seconds.
Shutdown Delay: This represents how many seconds to wait before initiating the actual shutdown after receiving the shutdown signal from UPS service. This is pre-set set to 300 seconds.
Apply button: Click the “Apply” button to save the changes to the above fields.
Note:
#1: No network UPS is supported, only support UPS is connected via RS232 or USB.
#2: For APC UPS, please use the “ simple signal cable ” for the RS232/COM port connection.
DO NOT use the “ smart signal cable ” which comes with the APC UPS by default.
1.4 Sensor
Depends on the motherboard used in the NAS systems, this page may or may not display anything.
There are two types of motherboard sensor implementations:
IPMI and None.
For None, the Sensor page will not display any info.
For IPMI, it will display readings for following sensors:
CPU1_Temp, CPU2_Temp, CPUx_Temp, etc.
System_Temp
CPU1_Vcore, CPU2_Vcore, CPUx_Vcore, etc.
CPU1_DIMM, CPU2_DIMM, CPUx_DIMM, etc.
+1.5V, +3.3V, +3.3VSB, +5V, +12V, VBAT, etc.
Fan1, Fan2, Fan3, Fan_x, etc.
Pick the item(s) that you want the NAS to monitor and click “Save” button.
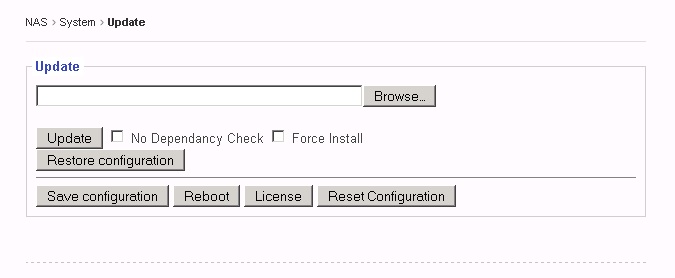
1.5 Update
 This page is used for the following functions:
- update patch
- restore previous configuration
- save existing system configuration
- reboot the system after updating patch
- enter new license to enable and reveal special Feature/Function
- reset system configuration back to factory default.
Update :
Browse: Browse the admin’s local computer for the patch file .
No Dependency check: From time to time, some specific patches may require check-marking this option in order for the new patch to be installed.
Update button: Click “Update” to update the selected patch file. After updating the patch, always reboot the system for the patch to take effect.
Restore configuration:
Browse: Browse the admin’s local computer for selecting the previously saved configuration file.
Restore configuration button:
This button will restore the selected previous-saved NAS configuration back to the NAS. Reboot for the restored configuration to take effect.
Save configuration: This button is used to export the current NAS configuration into a file and save it onto a local location on the administrator’s computer. This file serves two purposes: (1) for future configuration recovery purpose (2) email to technical support for trouble-shooting.
Each time the administrator makes some changes, such as adding users or deleting users, the configuration file needs to be re-saved again. In other words, keep the saved configuration file up to date.
When clicking “Save configuration” , the GUI will prompt you to browse and find a location in your computer to save the configuration file.
Note:
The saved configuration does not include physical volume info because volume info is stored and associated with the physical volume itself.
Reboot: Use the Reboot button to reboot each time after updating the patch. Reboot each time after restoring the configuration file.
License: Use the License button to key in a new license for following purposes:
- increase/extend supported capacity
- enable/reveal hidden functions/features
Reset configuration: This button is used to reset system configuration back to factory default. It will remove all user accounts, either local or imported; it will remove all LVs (logical volumes) and VGs (volume groups), either network share volume or iSCSI volume, thus it will erase all data.
It is useful for administrator who wants to start creating volumes and users all over without worrying any potential hidden corruption on the existing volume or unclear-flags on configuration files.
Notes:
#1: Since it will erase all data in the NAS, please take extra precaution when using this function.
Please make sure either you have a full backup of the data in the NAS, or you are sure you don’t need the data in the NAS any more.
#2: It will not reset the existing Network Configuration.

