4. Menu - Account
“Account” entry consists of following sub-menu entries/pages:
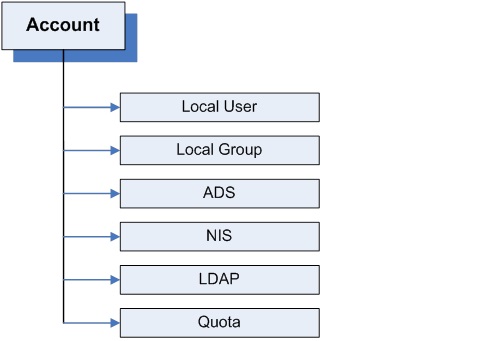
Account entry is used to allow the administrator to do following functions:
- Create local users and local groups
- Join Windows Active Directory Service Server or PDC
- Join NIS server for Unix/Linux NFS clients
- Join LDAP server for Unix/Linux NFS clients ( LDAP for SMB/CIFS clients is not supported )
- Assign quotas to users and groups.
4.1 Local User page:
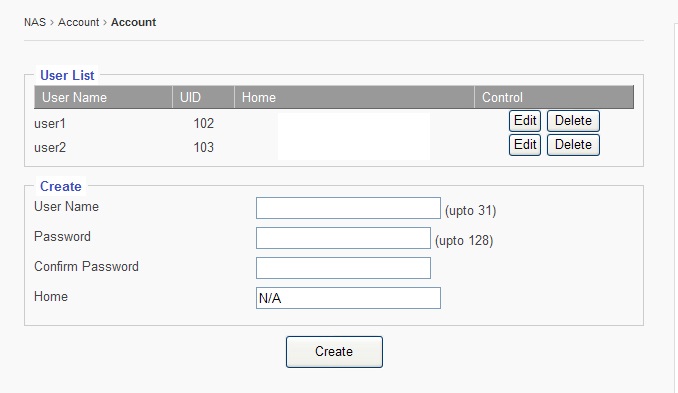
For Mac clients, they are considered local users, user accounts need to be created for them on this page.
For Windows clients on a Workgroup network, they are considered as local users, and need user accounts to be created for them on this page.
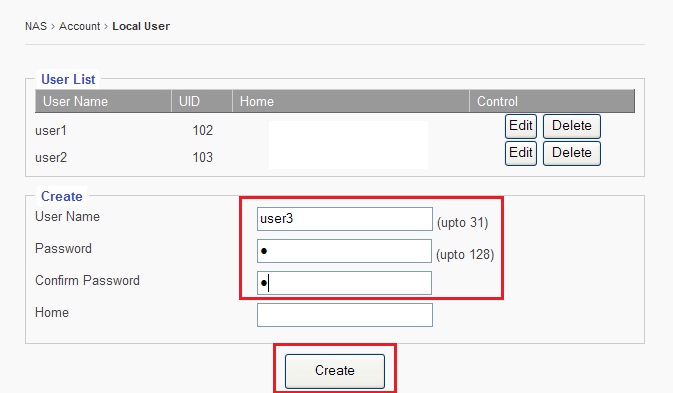
In other words, for Windows clients and Mac clients, if they are not syncing their user account info from ADS Server, NIS Server, or LDAP Server, then a local user account must be created on this page.
To create a new local user account:
- Enter a desired user name, up to 31 characters long.
- Enter a desired password, up to 128 characters long.
- Re-enter to confirm the password
- Click “Create”
4.2 What is ‘Home’ (Home Directory / Home Folder)?
The ‘Home’ option is used to create a sub-folder under the designated XFS volume (network share) for each user with the user’s account-name as the folder name. When a user logs into the network share, the user automatically has access to his/her home folder. Other users will not have access to this folder, unless the administrator uses the “Services - Access Control” to specifically modify which users are granted access. ‘Home Directory’ is also referred to as ‘Home Folder’.
The ‘Home’ option is only an option, not a “must.” It is purely dependent on the administrator’s personal experience and habits. There are no standard rules on when to or when not to use this feature.
Most of the NAS units in the data center do not use this option. But some IT staff found this “Home” option to be handy and are very used to it.
4.3 How to create and use ‘Home Folder’?
There are two steps to creating the ‘Home Folder’, and one step to assigning access permissions.
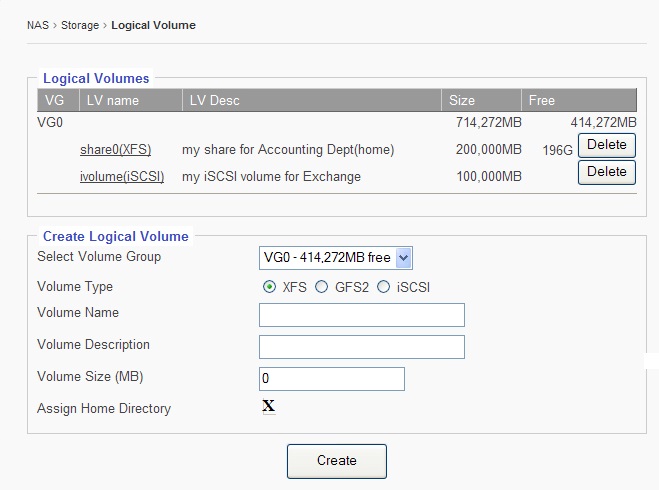
Step-1: Enable the “Assign Home Directory” option for the selected XFS volume in the “Storage - Logical Volumes” page. See below.
Step-2: When creating a local user, the administrator is given an option to create the ‘Home’ folder on the previously selected volume with the default path. See below:
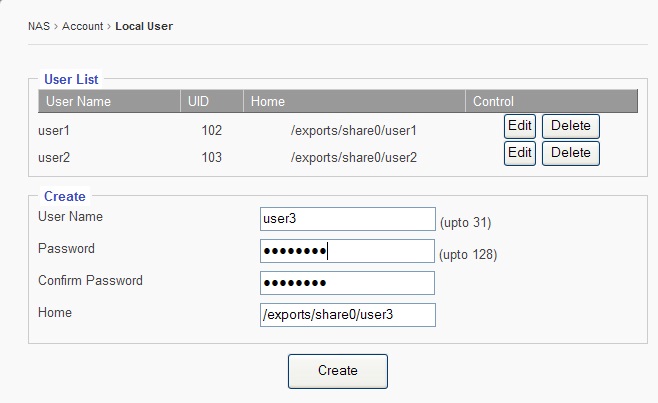
With the given example here: sharing_location, user1, user2, and user3; it works like below.
Inside the share folder ‘sharing_location’, there are the sub-folders: ‘user1’, ‘user2’, and ‘user3’; the directory looks like this:
\\sharing_location

\\sharing_location\user1

\\sharing_location\user2

\\sharing_location\user3
When user1 logins to the share, user1 will see it like this:
\\home

\\sharing_location

\\user1
In here, \\home and \\user1 and \\sharing_location\user1 are actually the same folder, it is just being displayed by different names at different locations. The user1 will have the full access permissions to them by default. If user1 navigates to \\sharing_location, user1 will see all 3 sub-folders: \\sharing_location\user1, \\sharing_location\user2, \\sharing_location\user3; but only has access rights to the \user1 sub-folder. The access rights for user1 to other user’s home folder can be granted by “Service - AccessControl,” which will be discussed in a later section of this user guide.
When user2 logs into the share, user2 will see it like this:
\\home

\\share_location

\\user2
In here, the \\home and \\user2 and \\share0\user2 are actually the same folder, it is just being displayed by different names at different locations.
Notice now \\user1 has been replaced by \\user2 when user2 logins.
Step-3: Assign user access permissions to the volume/share in the “Services - SMB/CIFS” page. Please refer to the Top-Menu Entry –Services section for more details.
4.4 Local Group
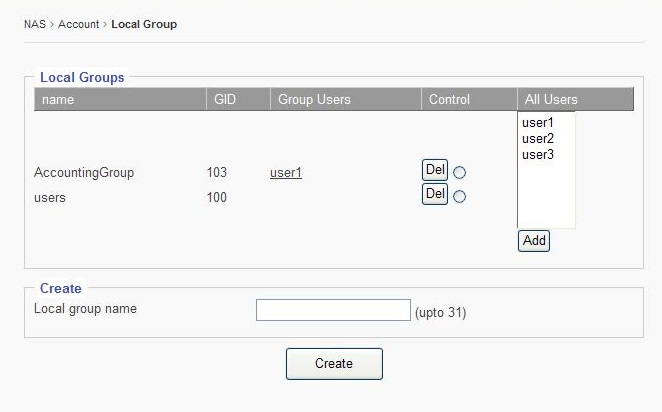
Local Group is used to create a group(s) of local users, so that later on, the administrator can simplify the process on assigning Access Rights for a group of users who share the same permissions instead of individually assigning rights to each user one by one.
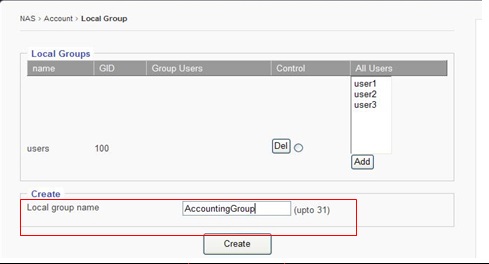
Creating Local Group:
Key the group name in the Local group name field, up to 31 characters long, without any spaces in between, and then click the “Create” button.
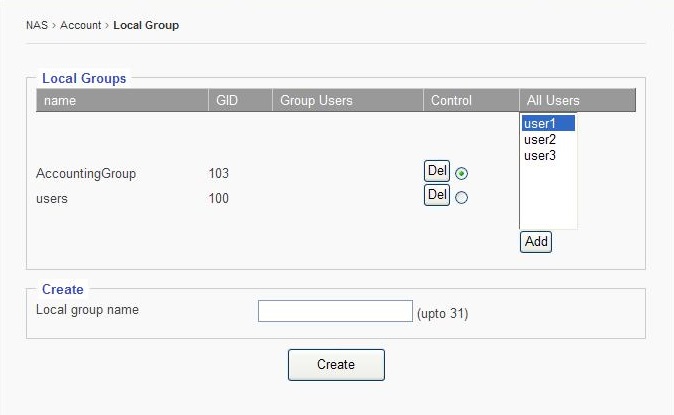
Adding Users to the Group.
Once the Group is created, the administrator can start adding users to it.
- Select the Group by clicking the little round dot
- Select the user name from the “All Users” window
- Click “Add” to save changes.
4.5 ADS
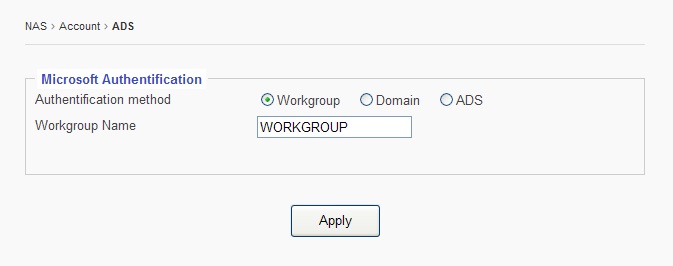
This section defines if the NAS will be in a stand-alone network (Workgroup), or if it will join the Microsoft PDC server, or if it will join the Microsoft Active Directory Service server.
4.5.1 Workgroup
If PDC or AD Servers are absent in your network or if you have PDC/AD Server in your network but you don’t plan to join the NAS to the domain for domain users, and then just select the “Workgroup” option.
Either leave the name “WORKGROUP” as it is, or you may change it to a desired name, then click “Apply” to save the changes.
4.5.2 Domain.
Domain is referring to the PDC created on a Windows NT or Windows 2000 Server.
If using a Windows Active Directory Service server, do not use the “Domain” option, instead use the “ADS” option instead.
To join a PDC:
- Enter the Domain Name
- Enter the PDC’s IP address in the “Controller” field.
- In the “Admin Account” field, enter the Administrator ID (it can be a User ID who has the equivalent rights as the Administrator)
- Enter the password for the Administrator on the PDC
- Click “Apply”
4.5.3 ADS
AD here is referring to the Microsoft Active Directory Service server. If using a PDC based on Windows NT, then please do not use the “ADS” option, use the “Domain” option instead.
Prerequisites for Joining AD Server:
- Time Syncing
The time on the NAS should be in-sync with the ADS server, meaning that the time on the NAS should be set to the same time zone as the ADS server, and the time difference should be less than 2 minutes apart. The time syncing can be achieved by setting the NAS to a common NTP server (refer to Top-Menu-Entry: Features - NTP)
- DNS Server and Local Domain
Make sure to provide accurate DNS Server information and “DNS search path” (local domain) in the Top-Menu-Entry: Network - DNS page.
4.5.4 Joining ADS Server
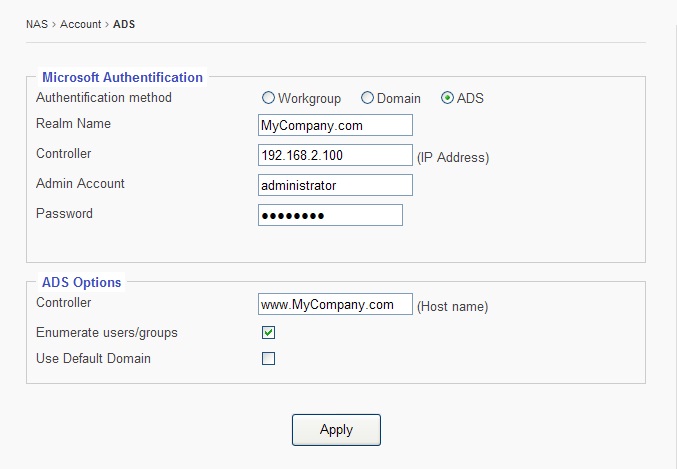
Select “ADS” option
Realm Name: = Domain Name = MyCompany.com
Controller: IP address of the ADS server
Admin Count: the administrator’s ID, it is normally the “administrator”, but it could also be a user ID who has the administrator rights.
Password: the password for the administrator on the ADS server.
4.5.5 ADS Option:
Controller (host name): Provides further detail info of the ADS server.
The “host name” here is the FQDN (Fully Qualified Domain Name), such as: ADS.mycompany.com
Enumerate User/Group: This option defines whether or not to sync users and groups on the ADS server into the NAS.
When this option box is checked, the NAS will sync users and groups from the ADS server to the NAS. Depending on the number of users and groups, this syncing process might take anywhere from a few minutes to a few hours. If there are too many ADS users and groups, it becomes unpractical to do so, and the option should be left un-checked.
When the ADS server has many users, normally they are divided into a few groups and each group shares the same access permissions characteristics. So even without importing the users and groups to the NAS, the administrator can manually type in the group names and assign access rights to them, plus a few exceptions on users. This step is done in the Top-Menu-Entry: Service - SMP/CIFS sub-menu.
There is no hard-coded standard for how many ADS users are too many to use “Enumerate User/Group” option. Couple hundred ADS users seems to be OK to enable it. Trial and error is the only way to determine actual capacity.
Use Default Domain: To the NAS, ADS user ID is in the format of: ‘domain\user’. If “User Default Domain” option is checked, then the user ID can be referred to as ‘user’ without the ‘domain\’ in the later on session: Top-Menu Entry: Service for ACL.
4.6 NIS
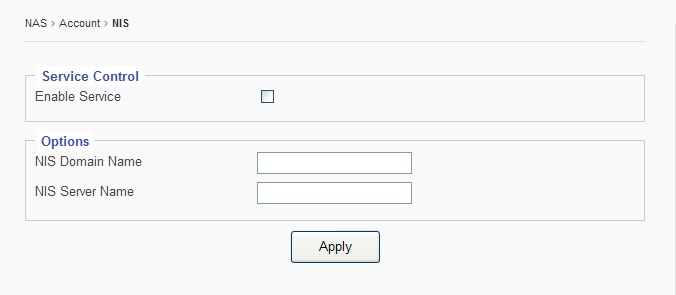
NIS stands for Network Information Service. It is a naming and administration system for smaller networks. Using NIS, each client or server computer in the system has knowledge about the entire system. A user at any host can get access to files or applications on any host in the network with a single user identification and password. NIS is similar to the Internet's domain name system (DNS) but somewhat simpler and designed for a smaller network. NIS Server is mostly used for Unix/Linux clients.
Not all Unix/Linux network use NIS servers. If you don’t have a NIS Server in your network, just simply skip this chapter.
If you do have a NIS server and would like to use one for NAS authentication, then,
- Enable the NIS service
- Key in the NIS Domain Name
- Key in the NIS Server Name
- Click “Apply” button
4.7 LDAP page:
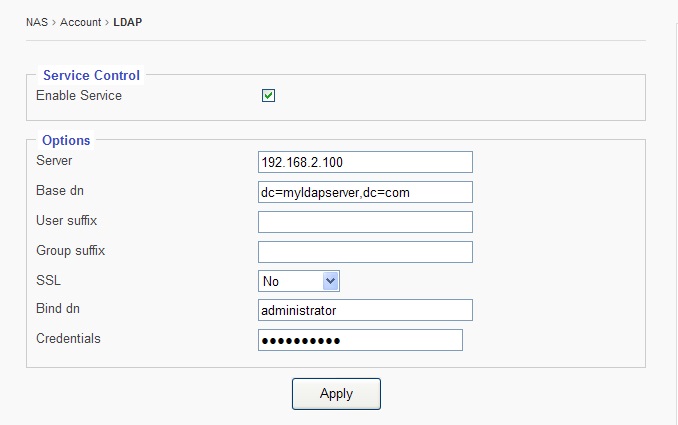
LDAP (Lightweight Directory Access Protocol) is a protocol used to access network directory for user/client authentication.
Note : the LDAP service supported by our NAS system is for NFS clients only. LDAP service for SMB/CIFS clients are not supported yet.
(NFS client = Unix / Linux clients; SMB/CIFS clients = Windows clients)
Enable Service – Check option box to enable LDAP service.
Server – Either IP or Name of the LDAP server
Base dn – It is the LDAP Domain name, if the Domain name is: mycompany.com
then it is in the format of: dc=mycompany, dc=com
User suffix – Defined by the LDAP admin, used to get the user info from LDAP server.
Group suffix– Defined by the LDAP admin, used to get the group info from LDAP server.
SSL – This displays if an encryption is being used
Bind den – Administrator ID of the LDAP domain.
Credential – Password of the admin ID on the LDAP domain.
Don’t forget to click the Apply button!
4.8 Quota:
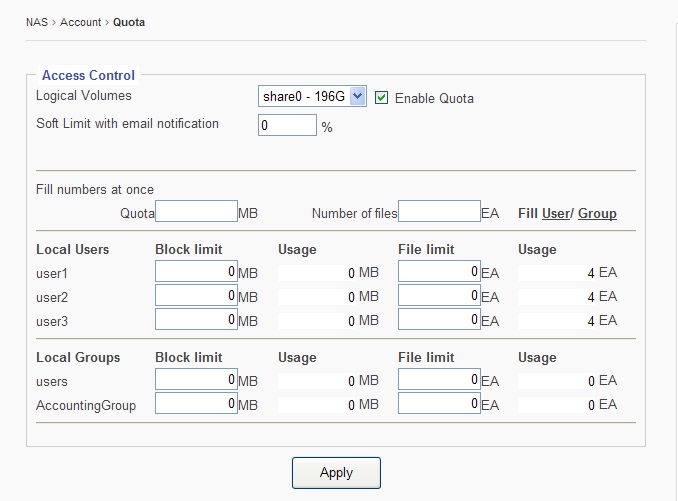
Quota means to assign storage limits to users or group of users. Quota can be either by size (MB – number of Megabytes) or by number of files.

Logical Volumes:
Pick the Logical Volume which you will assign quota for.
Enable Quota:
Check-mark the option box to enable the Quota service.
Soft Limit with email notification:
Enter the % for approaching Quota-Full warning. When the used capacity has reached the predefined % here, the system will automatically send out an email notification to the administrator for warning.
Fill numbers at once
This is used to fill every and all users or groups with the same number of Megabytes or same number of files with one click-action, so that the administrator does not need to assign quota user by user or group by group.
Enter the number of Megabytes in the field: Quota _______ MB
or enter the Number of files for each user/group, in the field: Number of files _______ EA
Click on ‘User’ to fill the quota to each/all users
or Click on “Group” to fill the quota to each/all groups
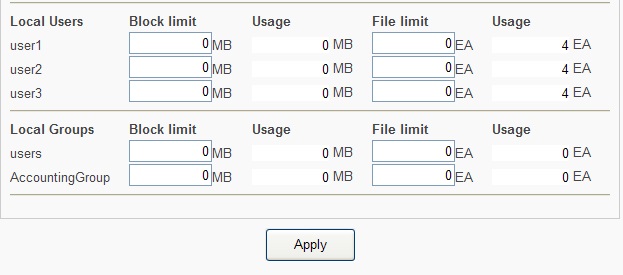
If you are not using the Fill numbers at once, then you can manually enter the quota for each user or group here.
Under the ‘Local Users’, all users are listed.
Under the ‘Local Groups’, all groups are listed.
Don’t forget to click “ Apply ” button.
